Showing posts with label Baking. Show all posts

Smarties Sugar Cookies {Halloween Recipe} #IAmASmartie


I love when I can take something that I love and create something equally as great. Smarties are one of my favorite Halloween sweet treats and I love passing them out to trick-or-treaters. Not only are they gluten-free, they're free of most allergens and are low in fat as well. But in this recipe they are most definitely not gluten free. Nor are they low in fat...

By pulsing the Smarties in a food processor I created a flour and used the Smarties in a family sugar cookie recipe. I simply reduced the amount of sugar called for in the recipe and subbed the Smarties flour. The end result was fantastic! A not-too-sweet sugar cookie that was definitely flavored by the Smarties. Yum!

And perfect for any Halloween party coming up. We baked them up for our parish festival's bake sale and they were quite a hit. Three to a bag with a few Smarties thrown in. Who could resist? Here's how to make them:

Smarties Sugar Cookies
  • 1 cup sugar
  • 1 cup butter, softened
  • 1/2 cup Smarties, about 20 rolls
  • 1 egg
  • 1 tablespoon vanilla
  • 1 tablespoon light corn syrup
  • 3 1/2 cups flour, sifted
  • 1/2 teaspoon salt


1. Unwrap the Smarties and place them in the food processor (I first tried to crush them with a rolling pin with no luck).


2. Pulse the Smarties in the food processor until ground to a fine dust. 


3. Measure out 1/2 cup of Smarties flour.


4. Cream the softened butter, sugar, and Smarties flour in a stand mixer.


5. Add in the egg, vanilla, and corn syrup. Mix well until combined.


6. Sift together the flour and salt.


7. Add the flour mixture into the bowl one cup at a time until combined.


8. Turn the dough out onto some plastic wrap and wrap tightly. Refrigerate for 1-2 hours.


9. When the dough is done in the fridge, preheat the oven to 375 degrees. Cut the dough into strips and then into squares. Roll each square into a ball. I created 1" balls so that the cookies would be small. Feel free to increase or decrease the size of the cookie dough balls.


10. Place the cookie dough onto a greased cookie sheet and smash down into a flat circle with a glass cup.


11. Sprinkle with some nonpareils (optional) and bake in the oven for 8-10 minutes.


12. Let the cookies cool completely on a rack before indulging, about 5-10 minutes.


13. Plate (or bag up) and enjoy!


This recipe makes about 70 1" diameter cookies. It can easily be doubled. You can also cut out shapes with cookie cutters by rolling the dough into a flat sheet after taking the dough out of the fridge.

Want to see what else I've done with Smarties? Check out this awesome DIY Smarties Wreath on my blog post here

What's your favorite sweet treat this Halloween season?

Disclaimer: I am a member of the Collective Bias™ Social Fabric® Community. This shop has been compensated as part of a social shopper insights study for Collective Bias™ and Smarties. All opinions are my own. #CBias #SocialFabric

Pumpkin Cupcakes with Maple Cream Cheese Frosting {Dessert Recipe}

As I mentioned before, I'm a bit obsessed with pumpkin. And as soon as I got a whiff of coolness in the air I got to baking. I've been craving these cupcakes since the first time I made them a few years ago and with a few minor tweaks I think I've perfected my recipe.

These were delicious! And even better when left in the fridge overnight and eaten for breakfast the next morning with a hot cup of coffee ;) But if you can't wait that long to savor the goodness just make sure to allow the cupcakes enough time to cool before frosting them. You won't be disappointed!


Pumpkin Cupcakes With Maple–Cream Cheese Frosting

Cupcakes
  • 1 stick unsalted butter, room temperature
  • 1 cup firmly packed dark-brown sugar
  • 1/3 cup granulated sugar
  • 2 cups cake flour
  • 2 teaspoons baking powder
  • 1 teaspoon baking soda
  • 1 teaspoon ground cinnamon
  • 1 teaspoon ground ginger
  • 1/2 teaspoon ground nutmeg
  • 1/8 teaspoon ground cloves
  • 1/2 teaspoon salt
  • 1/4 teaspoon freshly ground black pepper
  • 3 large eggs
  • 1/2 cup buttermilk
  • 1 teaspoon vanilla
  • 1 cup canned pumpkin

Frosting
  • Two (8-ounce) packages cream cheese, softened
  • 1 stick unsalted butter, room temperature
  • 2 cups confectioners’ sugar
  • 1/4 cup pure maple syrup
  • 1 cup heavy whipping cream

 Preheat the oven to 350° (175°C). Line a cupcake pan with 18 liners.

Cupcakes:
Pour the milk into a measuring cup and add vanilla.

In a stand mixer, beat the butter and sugars on medium speed until fluffy, about 5 minutes. Meanwhile, sift the flour, baking powder, baking soda, cinnamon, ginger, nutmeg, cloves, salt, and pepper into a medium bowl.

Add the eggs one at a time to the mixer, scraping down the sides after each addition. Alternate adding the flour and milk mixtures, beginning and ending with the flour. Beat in the pumpkin until smooth. Scoop the batter into the cupcake liners, about 3/4 of the way up. Bake the cupcakes until a toothpick inserted into the center comes out clean, about 20 to 25 minutes. Cool the cupcakes on racks completely.

Frosting:
In a stand mixer beat all the ingredients on medium until fluffy but firm. Frost the cupcakes using either a spatula or a pastry bag w/ a large tip. Refrigerate the cupcakes for 30 minutes to set up frosting.

Baked Peanut Butter & Banana Oatmeal {Breakfast Recipe}

If you're a peanut butter lover AND watching your figure don't walk, run to go make these! They are so tasty. And super filling. And, really, if you look at the recipe, there's nothing "diet" about them. I mean they have butter and real sugar!

No skimping out on this one. And if you're like me and eat a hearty breakfast every morning help yourself to a serving piled with bananas on top and non-fat vanilla yogurt on the side for an awesome and very tasty breakfast.

My son begs for these and I love that I can make a large batch and re-heat in the morning for him.  He loves to help make them as well. Since it's pretty straight forward I can usually pre-measure everything and let him take the lead.

Seriously... go make these now.

Inspiration: Two Pink Hippos (if you don't already follow these ladies you should!)


Baked Peanut Butter & Banana Oatmeal
  • 1 1/2 cups quick cooking oats
  • 1/4 cup packed brown sugar
  • 1/4 cup white sugar
  • 1 teaspoon baking powder
  • 1 teaspoon cinnamon
  • 3/4 tsp salt
  • 2 ripe bananas, mashed
  • 1/2 cup peanut butter
  • 1/4 cup melted butter
  • 1 egg
  • 1 teaspoon vanilla
  • 3/4 cup 1% milk
  • cooking spray
Preheat oven to 350 degrees. Spray a 9 x 9* baking dish with cooking spray.

Mix dry ingredients in a bowl and set aside. Take peanut butter & bananas and mash together until combined. Add egg, vanilla and melted butter and mix well.

Add peanut butter mixture and add to the dry ingredients. Top with milk and stir until combined.

Spread out evenly in the baking dish. Bake 30-35 until the edges are golden brown.

* You can also use a 9x13 dish and cut the cooking time to 20 minutes

What's your favorite breakfast recipe? 

Lining a Baking Pan with Foil {Tips and Tricks}

One tradition we have in our family is a cookie party after the holidays. Every year on the day before the cookie party we make all of the cookies. So I headed over to my husband's aunt's house to help out with the cookie baking. Now by cookie baking, I mean cookie baking. Like 8 different types of cookies. Lots. Of. Cookies.

While making the cookies this year we had an oops. We were melting chocolate and it seized. So we had to figure out something to do with it. And I decided to try and make brownies... or so I thought. The "brownies" I made didn't turn out so well but the tip I learned while making the brownies... priceless!

My husband's aunt saw me trying to line the pan with foil and quickly showed me this neat trick. Maybe I'm the last one to know about it but I thought I'd share anyway just in case anyone else didn't know!

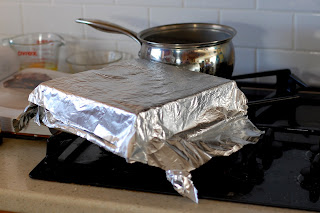
Simply turn over the pan and place the foil on the pan. Form the foil to the pan.


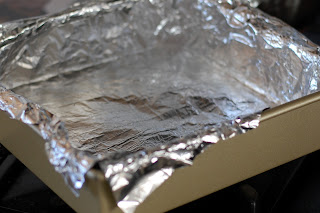
Take the foil off and turn the pan around. Line the pan and make your brownies!