Showing posts with label Crafts. Show all posts

5 Alternatives for Carving Pumpkins {Fun Kids Crafts}


Having small children can sometimes make pumpkin carving a bit difficult. So this year we went with something a little different and let the kids make a few varieties of pumpkins. Grab some glue, your potato head pieces, and even the paint and see what your kids do to create their Fall masterpieces!

If you're in the same boat and are looking for great alternatives to carving your pumpkins this year, here are a few ideas:

1. Painting your Pumpkins

Instead of carving out a design, simply use a paper cut out to block out a design on your pumpkin and paint around it! Head on over to FormulaMom.com to see how we painted the castle pumpkin above.

Add Cinderella's carriage by simply cutting out a few felt pieces and gluing them onto a fairytale pumpkin to complete the storybook tale. 


2. Mrs Pumpkin Head
See how easy it is to create a Mrs. Pumpkin Head (Mr. Potato Head's lady friend) with this easy and fun idea from Fabulous Finds by Tiffany.


3. Spider Web Pumpkins
With a little bit of spray paint and some puffy paint, you can create just about any design on your pumpkin with a great look! I created this Spider Web Pumpkin for our Amazing Spider-Man party that I'll be hosting on Halloween this year. I can't wait to see what my guests think.


4. Foam Sticker Pumpkins
When we went up to Mammoth Mountain a few weeks ago we got to decorate pumpkins at  Oktoberfest. Instead of letting the kids carve pumpkins, they had these awesome foam sticker kits they got from the craft store. Our kids made this pirate pumpkin and loved applying the stickers to the pumpkin.


5. Crayon Dripped Pumpkin
Now this has got to be the coolest looking pumpkin ever! Taylor Made Mama did it right when she made this Crayon Dripped Pumpkin. It reminds me of the drippings of a candle.

It's definitely Halloweenesque and would go great for any decor. Plus I love that you could easily use all one color or be selective in the colors you use to go with a theme or style.

How are you decorating your pumpkin this year?

How to Make a Spider Web Pumpkin


Each year we take the time to cut, gut, and carve out a few pumpkins. And every year we complain about the mess, the time, and the clean up. So this year we went simple! We let the kids paint pumpkins and we took an alternative approach.

We also used paints but used different kinds to make these spider web pumpkins. With the help of some spray paint and puffy paints we were able to make these super cool spider web pumpkins for our Amazing Spider-Man party and for our Halloween display.

It was super easy to do and I'm sure you'll find it just as simple to create a pumpkin masterpiece of your own! Here's what you do:

Spider Web Pumpkins

What you'll Need: 
  • Pumpkin
  • Spray Paint
  • Puffy Paint


What you do: 

1. Paint your pumpkin with your base color. We chose to go with black.


2. Using the puffy paint, make lines going down and across the pumpkin to create your web.


3. Add a spider to the web with puffy paint and let dry completely. 


Once the pumpkin is completely dry set it outside your door for everyone to enjoy!

How do you decorate pumpkins for Halloween? 

Re-Creating a Relaxing Bedroom with @BreatheBedding #CBias


Recently my husband and I upgraded our bedroom furniture and the size of our bed from a queen to a king to accommodate our growing family (and the fact that our kids had all but kicked us out of our own bed!). It's been a slow process but I am finally starting to love the results. Especially with our latest addition of Breathe Performance Bedding.

I can finally relax and enjoy our bedroom now that we've completed the last step in re-decorating. I've finally tackled the wall space above our bed and have purchased the comfortable sheets our family has been aching for.

Now typically we purchase bedding at discount and department stores (think Tuesday Mornings or Macys). We look for name brands at discounted prices and hardly ever pay full price for a set of sheets. We almost always wait for sales and try to stick with higher thread count cotton sheets since that's what we've known to work in the past.

But we've always had an issue with sweat at night and needed a solution.


Learning More about Breathe Bedding
In order to accomplish this feat, the kids and I headed to our local Wal-mart to check out Breathe Bedding. Not only had we not heard of Breathe Bedding before, we had also never seen it at Wal-Mart. So I was very interested in learning more.

Breathe Performance Bedding isn't your typical bedding. It is made with technology to help transfer body heat and moisture to keep you cooler, drier, and more comfortable. With a daughter who sweats quite a lot, I can tell you that moisture wicking sheets are not only helpful, but essential to a good night's sleep!

I loved the selection and color of the bedding and found a set of King sheets in a tan color that would be perfect for  our master bedroom. Not only did it look perfect for my sweaty family, it also looked stylish as well. The packaging drew my eye and intrigued me. Especially with a photo of Mia Hamm on the cover.

To read about my experience in purchasing Breathe Performance Bedding, check out my Breathe G+ Album.


Why Not Cotton? 
Your probably asking me why are Breathe sheets not made out of cotton. Well, cotton does not allow heat to be released. It traps heat in when you fall asleep and throughout the night leaving some sleepers to wake up in a full sweat. There have been many a morning that I've woken up to a puddle next to me from the amount of sweating my daughter does during the night.

Inspired by athletic performance fabrics, Breathe Performance Bedding works while you sleep to regulate body temperature throughout the night and allows an increase of ventilation. This leads to a more peaceful, comfortable sleep without the worry of over heating through the night.


Gaining Inspiration from Others
Once I had my bedding figured out, it was time to get crafty and do something with these bare walls. Taking inspiration from a few pins I had recently added to my Master Bedroom Ideas Pinterest board, and rummaging through the house for odds and ends, along with taking into consideration the colors of our new bedding, I created a few pieces to add to the blank space.

With the help of some spray paint, plenty of leftover frames, my fabric stash, and a glue gun I was able to transform a few pieces into something new that fit well together. I started with the burlap I purchased at Wal-Mart and the largest picture frame.


By simply painting the frame white, hot gluing in the burlap and adding some fabric flowers and a felt S I created a personalized piece of art for our bedroom (tutorial coming soon!). I quickly followed suite with framed fabric and an embroidery hoop but was still missing something.

That's when I decided to paint the canvas I had on hand. I was going to go with a chevron pattern but it just didn't work out with the amount of tape I had so I went with stripes. This is the only piece I am not happy with and I've since decided that I'm going to find a mirror to take it's place. Unless I repaint it completely.


Putting the Pieces Together
Once I had all of the craft projects finished it was time to put together my new room decor. I stared by making the bed and grabbing the bedspread. I needed to visualize exactly what the artwork would look like on the wall so I layed it out on the bed and checked out the positioning.

Then I did what I normally wouldn't have done... I started blindly leveling and hammering to put everything up on the wall. Now normally I leave the measuring, leveling, and hammering to my husband. I've been known to just blindly go in and make holes everywhere until its to my liking and my husband doesn't quite appreciate my approach. But since I knew this would never get done if I waited I moved on by myself.


I have to say that I really like the end result. The combination of the new sheets and the added artwork to the walls makes the room feel complete and makes me feel accomplished! Finally our master bedroom is finished and I cannot wait to lie down and enjoy it.

Good thing it's naptime!

How have you spruced up your home lately? 

To find out more about Breathe Performance bedding, head on over to their website. You can purchase their bedding sets online or in select Wal-Mart stores. You can also find Breathe Bedding on Facebook and follow them on twitter at @BreatheBedding.

Disclaimer: I am a member of the Collective Bias™ Social Fabric® Community. This content has been compensated as part of a social shopper insights study for Collective Bias™. All opinions are my own. #CBias #SocialFabric

How to Create a Magic Wand for a #Halloween Princess Party #DisneyPrincessWMT


How to Create a Magic Wand
My daughter is obsessed with all things wands, swards, and sticks. Anything she can swing around and bop people on the head with (gently of course), she loves. And with our recent obsession with Cinderella since it came out on Blu-Ray we've been using sticks and swords to turn objects into other things just like the fairy godmother did for Cinderella.

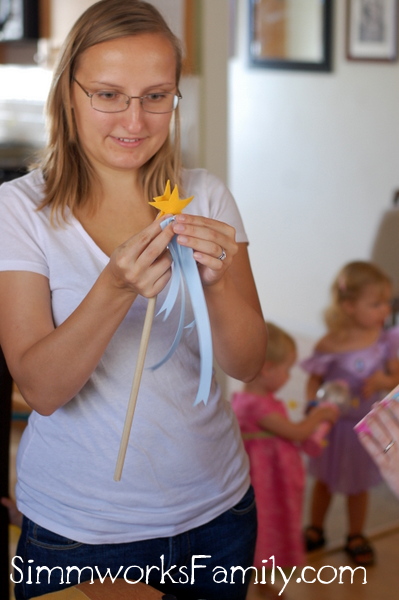
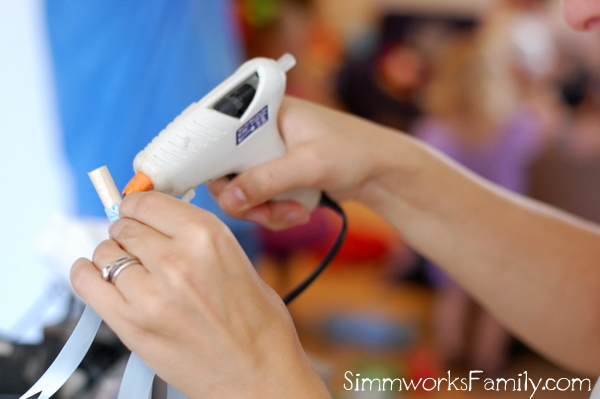
As I was planning and preparing for our Halloween Princess party I decided to let the girls make their own wands customized to their likes and needs. It really was a simple craft and the kids had a great time doing it! With the help of mom and a glue gun to finish everything off.

So if you're little princess loves wands as much as mine does, I highly suggest trying your hand at making a magic wand. It's simple, easy, and takes less than 5 minutes!

Here's how!

What you'll need:
  • wooden dowels, cut to size (we purchased 48" dowels and cut them in thirds)
  • felt, any color
  • ribbon, any color
  • glue gun 


What you do: 

1. Cut out felt into the size and shape you want for the top of your wand. Cut out coordinating ribbon in the amount and length you prefer.


2. Do a dry run before gluing everything together to make sure the felt pieces fit together on the top of the wand.


3. Tie the ribbon onto the top of the stick and secure with the hot glue.


3a. Make sure to go all around the dowel so that the ribbon doesn't slip down.


4. Now it's time to glue down the felt pieces. Start with a small dab on one side of the dowel and adhere the first felt piece. 


5. Then add a few dabs of hot glue to the other end of the dowel and the felt piece already adhered. Place the second felt piece on top covering the top of the dowel completely and sandwiching the ribbon in between the two felt pieces.


6. Hand the wand over to your favorite princess and watch them play!


See how easy that was?

What type of wand would you make? 

A special thanks to my friend Kari of Mommy To Elodie for allowing me to photograph her putting her wand together at the party. It was rather hard trying to take pictures AND use a glue gun so I'm thankful for not burning myself. Plus Kari always has a creative edge when making crafts so I knew she'd make a gorgeous wand!

Disclaimer: I am a member of the Collective Bias™ Social Fabric® Community. This shop has been compensated as part of a social shopper insights study for Collective Bias™ and Disney Consumer Products, Inc. All opinions are my own. #CBias #SocialFabric

Smarties Are The Perfect Halloween Sweet Treat #IAmASmartie

One of my favorite parts of my childhood Halloween experience was racing home from trick or treating to sort out all of the Halloween candy I received. I was obsessed with finding my favorites (Smarties were at the top of the list along with chocolate). And one of my favorite parts of Halloween now are the decorations we put up each year. I absolutely love how festive and creative we get each year.

My husband is quite the Halloween decor enthusiast. Each year he purchases foam pumpkins from the store and creates a new face. And in an effort to keep up with him, I try to get creative as well in the decor inside our home.

Smarties Halloween candies #IAmASmartie

Gluten-Free and Allergen Free
This year I headed to Target to pick up some decorating supplies and candy to pass out. Since there are so many allergies and special diets these days, we went simple. Smarties all around! And I planned on decorating with Smarties as well.

Smarties are not only gluten-free, but they also contain no peanuts and are fat free! They're the worry-free, one-size-fits-all candy this holiday and are the perfect choice for passing out. I was able to pick up a large bag of Smarties and another bag of Smarties and Dum-Dums mixed together. My daugther was absolutely elated to put these bags into the cart to take home.

How to DIY a Smarties Wreath this Halloween #IAmASmartie

When we get ready for Halloween, decorations in our home are up there with Christmas. We decorate the whole house inside and out to celebrate for the whole month of October. Many of the decorations we use can be carried into November as well with a festive Fall theme but a few we make just for Halloween!

This Smarties Wreath is just that. The perfect celebration of Halloween and the excitement that each child feels as they go from door to door saying, "Trick or Treat!" This wreath is not only festive, it's easy to make as well! You only need a few simple items to put it together and it takes less than 30 minutes to make!

As an added bonus, it only cost me $5 to make. The $1 Spot at Target has these foam wreaths and the Smarties candies are only $7.99 for a huge bag and I only needed 1/2 the bag to make the wreath. I had the ribbon on hand from the end of season sale last year. And the left over Smarties will be passed out to trick or treaters on Halloween!   

Here's how to make a Smarties Wreath

What you Need:
  • 1 bag Smarties candies, in their wrapper
  • 1 wreath (I found mine in the $1 Spot at Target)
  • a glue gun with glue sticks
  • wire ribbon

What you do:

1. Lay out your wreath and candies as your glue gun warms up (I recommend not having the younger kids help with this part of the craft due to the hot glue gun).
 

2. Start with a single row of Smarties first by making a line of hot glue on the wreath.


3. Stick the Smarties candy seam side down so that the candies are sealed shut.


4. Continue to add Smarties candies all around the wreath. Make sure to leave room in between the candies on top so that the candies form a uniform circle around the wreath template. Make sure to leave a 1" gap for the ribbon at the top of the wreath.


5. Once the first layer is done, it's time to start the second layer to fill the gaps.


 6. Add a dab of glue to the center of the gap. Then add a dab of glue to the other end of the Smarties candy on the seam side. Firmly press down so that the glue adheres to each side of the Smarties candies next to it.


7. Once the Smarties candies are adhered to the wreath, measure out some wire ribbon in a coordinating Fall color.


8. Cut the ribbon to length.


9. Take both ends of the ribbon together in your hand and fold in half lengthwise.


10. Using the scissors, cut the ribbon ends at an angle to create a v-cut.


11. Once the ends are cut it's time to tie the ribbon onto the wreath!


12. Wrap one end of the ribbon around the gap at the top of the wreath once.


13. Making sure that the ends are even in length, tie a simple knot to secure the ribbon to the wreath.


14. Hang on your door and enjoy all season long!


And remember, Smarties isn't just the perfect candy to make a cute wreath, they're also the perfect candy to hand out this Halloween! They're low fat and gluten free! Not to mention that kids love them.

Stay tuned for more Smarties fun soon!

Disclaimer: I am a member of the Collective Bias™ Social Fabric® Community. This shop has been compensated as part of a social shopper insights study for Collective Bias™ and Smarties. All opinions are my own. #CBias #SocialFabric

Recycled Portable Snack Container {How-To}


With a love of coffee and creamer comes a surplus of creamer bottles left over once I've had a few morning cups. So taking a spin on recycling a bit further, I removed the wrapper over one of my creamer bottles and cleaned it out very well after it was empty.

What resulted was simple recycled portable snack container. And it's perfect for little hands!


Here's how to make a Recycled Portable Snack Container: 

1. Grab an empty creamer container.

2. Rinse and wash thouroughly.

3. Remove outer plastic from bottle.

4. Fill up with your child's favorite small snack.

5. Enjoy a snack on the go!


Not only does it fit perfectly in my daughter's stroller, it also pours out just a few snacks at a time reducing waste and messes. Each time we go out for a run my daughter reaches for her portable snack container so she can enjoy her snack on the go!

What does your child love to snack on?