Showing posts with label pinterest. Show all posts

Pin It To Win It {@littleonebooks Giveaway}


Share your favorite children’s books on Pinterest and you could win a $50 gift card to Little One Books.

The rules are simple. First, visit Little One Books on Pinterest at www.pinterest.com/littleonebooks and click “Follow all.” Then, create a Pinterest board called “My Favorite Children’s Books” and fill it with your favorite books, cds, dvds and more from Little One Books. Pin at least 10 items to the board and then submit your board by posting the link in a blog comment below. Entries are due by April 30, 2012 at 11:59 p.m. PST. A winner will be randomly selected on May 1, 2012 and notified via email.

Please help Little One Books spread the word about this contest by pinning the image to Pinterest and sharing this link via Facebook, Twitter or your blog.

Good luck! And remember to follow the Simmworks Family Blog on Pinterest too.

Don’t have a Pinterest account yet? Please contact me at simmworksfamily@gmail.com for an invitation to join.

Heart Shaped Crayon Valentines {DIY Tutorial}


I first saw the crayon heart valentines on the Family Fun website. I thought they looked adorable but didn't have a heart mold so I figured I'd just send the regular store-bought valentines instead since I had a few I purchased on clearance a few years back. Then we went to Target and I saw the heart molds in the dollar section of the store and I couldn't pass up the opportunity. Plus they were all over Pinterest!

So I went to the store, stocked up on a mold and crayons and headed home to do some experimenting. Before I started I did a little research to see what others were saying about the craft. I try not to just jump into a tutorial without reading about it from a few others first. That can lead to disaster (or just make it harder on me since others have found key tips/tricks on making it easier). Once I got the low-down I headed to the kitchen to soak, unwrap, break and bake! And here's what I did:

Materials Needed:
  • 1 box crayons, unwrapped (or left over broken crayons laying around)
  • 1-2 heart molds, choose your size
  • Construction Paper
  • Alphabet stamps OR printer
  • Adhesive dots

What to do: 

Place your crayons in a heat proof dish & preheat oven to 250 degrees.


Heat up some water and pour warm water on crayons (note: do not use boiling water... crayons might melt).


Let crayons soak for 30 seconds (see what happens when your water's too hot?).


Unwrap crayons (any that didn't unwrap easily after soaking were set aside and not used).


Put crayons in a dish and let kids break them up into small, tiny pieces (or put them in a bag and hammer with a kitchen mallet or meat tenderizer until broken up).


Place heart molds on a rimmed baking sheet and fill with broken crayon pieces.


Place tray in oven and bake for 15-18 minutes or until crayons are fully melted. Then carefully take out of oven and set aside to harden.


Once cooled completely pop crayons out of molds and smooth edges by rubbing against a piece of paper.


Now's the fun part! You can decide what you want to do with the crayons once you've baked them. I decided to use scrapbooking paper I already had in the house to create a postcard sized Valentine for my son. You can use this printable here for a square valentine with the writing already on the paper or this printable here for a circle valentine (you just have to add your child's name).

Or you can do what I did and use an alphabet stamp set to customize the sayings you put on each valentine. I simply adhered the crayon to a square piece of scrapbook paper with a glue dot and than layered that onto a larger postcard size piece of scrapbook paper. Then I stamped the sayings I wanted as well as my son's name to personalize it. You can also have your child decorate the postcard paper by drawing or coloring on it before you stamp out your sayings. You can find more sayings here (as well as more printables!).

The possiblilties and variations really are endless with this craft. And the kids have a great time helping you make them too. Much more personal then a store-bought valentine and twice as cute!


Pin It

Love is in the Air {Holiday Home Decor}


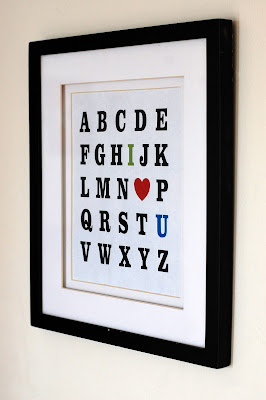
In an effort to keep the holiday momentum going in our home after Christmas I've attempted to decorate the house for Valentine's Day. How could I not with all of the pins I've posted onto my Valentine's Day board on Pinterest? I printed out this ABC I Love You printable you see above from Formula Mom's Valentines Day Printables post and framed it in a picture frame that wasn't being used. I plan on updating it with a printable for each season and have it hanging in my hallway/entry way.

I also decorated the mantle with things I had around the house as well. I just left up the fabric pendant banner I made for Molly's birthday and layered it with a paper banner I purchased a few years back on clearance. I love the reds, pinks and aquas!

I had a hanging heart that I used last year as a wreath for the front door and just added it to the mantel. And I found these adorable wooden LOVE blocks in the dollar section of my local Target. I added a few silk roses I purchased at The Dollar Tree in a tea cup paperweight I had left over from Molly's party and the mantel was done! Simple and perfect for our home. I can't wait to start thinking up ideas for the next month!


Do you decorate for the holidays? Do you stick to the big ones like Halloween and Christmas or do you decorate throughout the year? I'd love to see what you've done!


Pin It

For the love of Pinterest

Follow Me on Pinterest

Have you become addicted yet? To Pinterest that is. I sure have! And no, it isn't the time suck I thought it'd be. It's actually helpful! And I'm starting to use it to meet the goals I've made for myself for the new year. The first one... getting organized!


The picture above is an extra spaghetti container I had lying around the house. I didn't remember if we purchased one or not a few months back and they were on sale at either Home Goods or Tuesday Mornings so I bought it. To find out that I already had one... filled with spaghetti. So it's been in my cupboards empty ever since because honestly I suck at returning things I don't need. That might be one of the problems I'll need to solve as I'm organizing my house and life but we'll get to that later.

Back to Pinterest. So this morning I hopped on the website while I nursed Molly and waited for Ethan to get up and join us for breakfast. And I came across this pin. A spaghetti container used to house cupcake liners. Genius! My cupcake liners currently took up a lot of room in my baking box and I was told that I couldn't buy more because we just didn't have the room. I like to buy my liners on clearance after whatever particular holiday just passed so not being able to buy these suckers for the past few months has given me some sort of cupcake liner withdrawal. So as soon as I saw the pin I ran to the cupboard, grabbed the empty spaghetti container and started filling that sucker up. Problem solved.

And now I'm ready to go buy clearanced cupcake liners to fill it up even more! Yes, I know how bad this sounds even as I'm typing it but the spaghetti container can only hold so many liners and I'll stop as soon as I get to the top. I'm getting organized, not going overboard. I promise!

What have you made or done that was inspired by Pinterest lately? Haven't taken the plunge? Why not?